Friday, 17 June 2011
Thursday, 16 June 2011
Overall Reflection
Working on leap of faith was a turning point for me. This is because whilst working on this project i have realised that i have a lot of potential when it comes to 3D Modeling. My confidence has improved significantly and i have tryed to put in 100 percent into everything. I have had support from Daniel Dali who gave me encouragement, as well as recieving support from Depa. I have tried out new techniques when it came to modeling. Modeling the owl was very difficult at times because i had to take typology into consideration. I was paranoid i would have a model that will not be able to be rigged. To avoid this i sent snap shots to Clym who would be rigging it. Clym was happy with what i had done, and how i communicated with him often. It was a real pleasure working with everyone in the group. Working with people who i think are more skilled than me, helped me to realise my potential. I have worked very hard this term and i have never been in a comfort zone. I finished most of my tasks on time, which made me able to focus on other things.
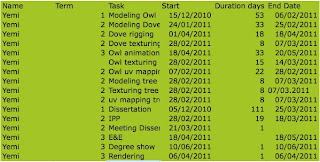
During this whole year I have scheduled myself in order to complete various tasks on time. By having a schedule I can see when tasks have to be completed. There are also a lot of dependencies when doing tasks. For example the Owl that I am modelling has to be completed on time. This is because Clym is rigging the character. If I don’t model it on time it will mean that Clym will be delayed. And if Clym doesn’t rig the character on time it will mean that Alex will be delayed from animating. This is why I took this schedule very seriously; I approached it in a very professional manner. All of the deadlines for modelling were given to me by my director Depa. She was generally very pleased with the way I approached each task, and with the quality.
During this whole year I have scheduled myself in order to complete various tasks on time. By having a schedule I can see when tasks have to be completed. There are also a lot of dependencies when doing tasks. For example the Owl that I am modelling has to be completed on time. This is because Clym is rigging the character. If I don’t model it on time it will mean that Clym will be delayed. And if Clym doesn’t rig the character on time it will mean that Alex will be delayed from animating. This is why I took this schedule very seriously; I approached it in a very professional manner. All of the deadlines for modelling were given to me by my director Depa. She was generally very pleased with the way I approached each task, and with the quality.
Thursday, 9 June 2011
Final dove animation
I am happy with what i have done so far. I have used one of the 12 principles slow in and slow out. It has helped me significantly because i have now got the motion. This did take me a very long time, but my patience has been what helped. I have also used another principle time. I have kept certain bits fast and certain bits slow, in order to get the motion of a bird.
Dove animation test
This is my first test so far. I am happy with what i have done so far i did not think i would get the motion so quick. It did take me some time, but i am determined to do a good quality animation.
Wave Principle
Major task
Within our movie there is a scene where the ink pot falls down, and a flock of doves sprout out into the air. Depa has assigned me to animate the doves flying out. In order to make this a success i will be looking at animations of doves flying. I will also be going back to some of my previous research on doves, in order to know how they pose. One book that could prove useful is a book called cartoon animation by preston lair.
Owl animation test
I did an animation with the Owl to make sure that the blendshapes that i did work effectively.
animation test
I intend to do a walk cycle with the liberian. So i did a test with the ball rig just trying to get the motion of the waist and legs correct.
Reflection on lighting tests.
Lighting tests
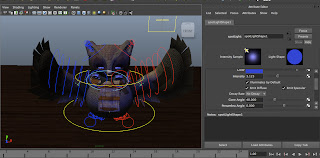
I want to explore lighting within Maya. So what I have done is taken my owl and used ambient and spotlights. I noticed in the initial stage the spot light was too much. So I looked in the attribute editor and found a way to tone it down by using an attribute called penumbra angle. I also found that when doing lighting tests point light show the bump maps more. The lower the intensity the more the bump map show, the higher the intensity the less it shows. I found that very interesting to know. Lighting is something that I have not touched upon during this term, as it is not my specialism.
Resolution
A low resolution gives a softer shadow. A high resolution and a low filter gives a harsh shadow. I also found that as I was increasing the size of the shadow rendering was taking even longer. So when rendering with my group we are going to have to have to decrease the resolution size. This is very useful information because by doing this we can insure we have a finished movie.
Light linking/Shadow linking
I did some research into how to enhance my lighting skills online, and I came across a method called light linking. This is when you disconnect a particular mesh from a light source. I also found out that I can disconnect shadows from particular objects as well. This can be done either using ray trace shadows or in depth shadows. It is another way in which we can make things interact within a scene. This is useful when trying to create depth of field. This has been a good learning curve for me, as lighting isn’t my strongest area.
Tuesday, 7 June 2011
shadow 1
Adjusted spotlight
Spotlight test
Thursday, 2 June 2011
Reflection/Communication
Communication has been very important when carrying out tasks. I have communicated with Depa via phone, email, and facebook. Any difficulties i have had i have notified Depa, as opposed to neglecting it. Depa and i have got on very well and she has given me a lot of credit for the work i have achieved. And i have given her a lot of credit. I communicated with Depa on a weekly basis to let her know the stages that i am on. I have enjoyed working with Depa and having her as my director. I have tried at all times to act very professional at all times. I have found that communication effects everything, if i am delayed with modeling my character. It will effect the amount of time we spend animating. So in a sense we are all depending upon each other.
Wednesday, 27 April 2011

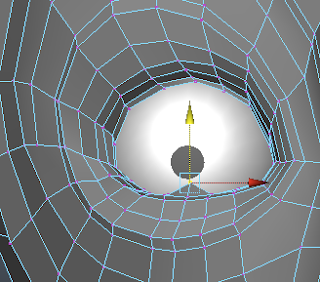
I had to move a lot of vertices around the eyes in order to create the blend shapes. I had to also keep checking that some of the vertexes were not overlapping. I also made sure that it flows around the eyes very well. Poor blend shapes equals a poor animation. Before i did blend shapes i was a bit worried because i did not know what to expect. But i actually enjoyed doing blend shapes.
Reference on blend shapes
Reflection/Blend shapes


For the Owl i have created some blend shapes in order for the owl to have facial expressions. From speaking to Depa i know that the Owl is going to have a mechanical and slow movement with the eyes. So in order to make the animation affective i exaggerated some of the expressions. I made the eyes really wide open. It took me a while to do the blend shapes because i want the animation to be as smooth as possible. This requires a lot of patience. The more blend shapes i do the better the animation. Depa just wanted me to do 4 expressions because most of the movement is around the eyes.
Wednesday, 20 April 2011
Improvements to the Dove
I have gone into the outliner and i have painted the weights so that there is not any deformation. As you can see when i rotate the neck downwards the stomach is not going into itself.When i rotate the right arm up wards the mesh around the stomach doesn't come towards me. And when i move the neck to the side bits of the stomach do not follow anymore. It did take me a long time to paint the weights, but it was worth while.
Reflection
So far i have rigged the wings of the dove. In the first image of the dove it is deformed and there are dents near the stomach. This is because it is not weighted properly. So what i did is go in to the outliner and add and reduce weight, and now the dove looks a bit evened out.
Rigging of the Dove
I will now attempt to rig the dove. The main things that will be moving will be the wings, the neck and the feet. I will be looking at tutorials online, for how to rig wings.
Reflection
So far when texturing the Owl i wanted it to look very stitch like.I feel i have managed to get the desired look that i was looking for. I have used a variety of colours, and materails to form a texture. I used a bump map as well in order to give the character more depth. There were some difficulties when texturing around the arm, it was slightly stretched. I took all of the information on board that Depa told me and i have executed it well. I made sure that the texture wasn't flat.I resolved the problem with the initial bump map. The bump map was too 3d and was starting to look like a toy. I toned it down a bit and it now have a better look. I looked at a variety of textures in order to make my character look appealing.I spent a lot of time on texturing and re arranging the layers in order to make the texture look more affective. I did not want to just do a mediocre job.
With regards to my tree it did take me a while to model. At first i was having difficulties with modeling it. This is because it was looking very block like and not rounded like how a tree should be. In order to improve it i rotated the edges in 45 degrees clockwise in order to make it twist. Uv mapping the tree was difficult because there is so much going on in terms of geometry. I came to the conclusion that automatic mapping would be the best way to map it. I wanted to keep everything flat.
With regards to my tree it did take me a while to model. At first i was having difficulties with modeling it. This is because it was looking very block like and not rounded like how a tree should be. In order to improve it i rotated the edges in 45 degrees clockwise in order to make it twist. Uv mapping the tree was difficult because there is so much going on in terms of geometry. I came to the conclusion that automatic mapping would be the best way to map it. I wanted to keep everything flat.
Subscribe to:
Comments (Atom)


